Laser robots from Inspector Systems measure the inner contours of pipes. Deep-sea pipes are mostly used to transport crude oil, natural gas or water over long distances.
If these transport media are highly corrosive, the inside of the pipe is protected with a corrosion-resistant alloy (CRA). In this there are differences: If the alloy is metallurgically bonded to the carrier steel, the pipes are plated or clad pipes. Pipes are referred to as mechanically lined pipes when a corrosion-resistant sleeve is inserted into the carrier steel - also called pipe-in-pipe.
Both have their advantages and disadvantages. Once a type has been chosen, it is necessary to comply with the international regulations and standards regarding designs and material selection for the construction of the pipeline. Particularly important here are tests and verifications of various kinds in advance to ensure the integrity under subsequent load because leaks must not occur in the oil and gas industry.
A challenging project
The laying of deep-sea pipes on the seabed is fundamentally fraught with challenges, especially as water depth increases. The client of Inspector Systems is an expert in the art of winding rigid pipes of the highest stability onto spools before they are taken to the open sea for laying. In the so-called R-method, R-lay or also Reel-lay operations, one of the most effective installation methods of pipelines for offshore oil / gas applications, normally, twelve-meter-long individual pipe sections are welded together on land to form strands several kilometres long on a so-called "spoolbase" and spooled onto a huge drum of a ship for transport to the installation site in the sea.
During offshore installation, the pipe is then uncoiled again, straightened and sunk onto the seabed. Due to the high mechanical stresses of spooling and uncoiling, this installation method is currently limited to small and medium pipe sizes in the range of 3 to 16 inches. But what needs to be considered or found out here? In drum laying, plastic expansions (changes in shape) of different sizes which subsequently change the material properties are repeatedly introduced into a pipeline. A generally irreversible process that can affect both the strength and toughness of the material. In order to be able to evaluate the effects on the material and to ensure that the structural pipe behaviour also meets the stress requirements, extensive tests are carried out in advance for tension, pressure, ageing, etc. and coil windings are simulated.
Inspector Systems receives confirmation of its experience and quality
Due to its many years of experience and well-known product quality, Inspector Systems and its high-precision laser robot technology was commissioned by a leading global provider of solutions in the oil and gas industry for the above-mentioned pre-field tests for a defined testing topic. This involved measuring the internal contours of lined deep-sea pipes with the aid of laser technology for assessment and verification for subsequent installation in the sea. The background is the imminent development of a huge oil and gas field off the coast of Brazil. At its production sites in Europe and North America, the customer carried out simulations of bending cycles on the 6, 8, 10 and 12 inch pipe types destined for installation.
Here, 12-metre test pipes of one type of pipe were set up on a bending device with the identical bending radius as that of the drum on the ship. The simulation then included several bending cycles and the subsequent straightening of the tube. In doing so, the process of bending the tubes for spooling can cause, for example, the alloy to loosen or the ovalization of the tube to increase excessively, which are highly undesirable. The ovality of a pipe is a key parameter for deep-sea applications. It extremely influences the pipe's ability to resist bursting under external pressure.
Precise measurement data for reliable evaluation
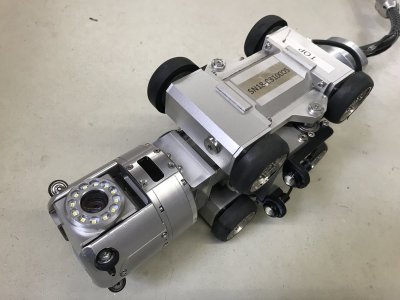
To obtain the measurement data required for this, special laser robots from Inspector Systems were used. Consisting of a drive unit with encoder displacement measurement and a 360° rotatable laser measuring head with a high-resolution inspection camera, depending on the position in the test pipe, hundreds of cross-section measurements were carried out in a test pipe at intervals of 5 to 10 mm in order to be able to assess the behaviour of the ovality before, during and after bending or straightening.
The measurement itself was carried out by means of laser triangulation, that is, in this method a sensor sends a point of light onto the inner surface of the pipe and the reflected light in turn hits a receiver cell in the sensor at a special angle.
Depending on the distance, the angle of incidence, and thus the position of the light spot, changes.
For each cross-section measurement, the distances of 450 to 1,000 measuring points were recorded by means of angle measurement during the circular rotation of the laser spot along the inner surface of the pipe, according to the desired resolution, and from this the data for the assessment of the inner profile was supplied. An integrated inclinometer for recording any changes in inclination also ensured additional validity of the measured values. The laser robots performed their work so simply and reliably that the customer himself took over the operation and evaluation as the project progressed.


