When the energy group EDF announced the construction of a third reactor in Flamanville (France), which is the third generation of pressurised water reactors, INSPECTOR SYSTEMS has been present with its pipe robot technology and service since the beginning of the installation of the pipe system as a subcontractor for the quality assurance of the internally located weld seams.
After the long construction phase, the completion and commissioning of the impressive structure with a net output of 1,600 MW is now imminent. From the start of the project, we have continuously developed our robot technology over time and have succeeded in integrating several applications in one robot system - grinding, suction and laser scanning.
This combination makes it possible to optimise the welds to be processed much faster, while at the same time fulfilling all requirements. These innovative combination robots cover a pipe diameter range from DN 500 to DN 750. Of course, like our complete robot family, they can travel through bends, valves, horizontal and vertical pipe sections - all standard features from INSPECTOR SYSTEMS.
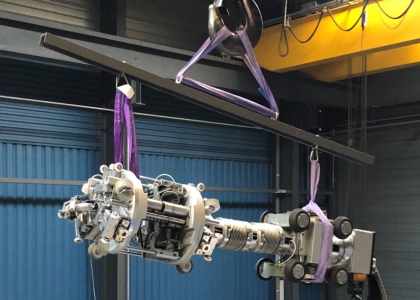
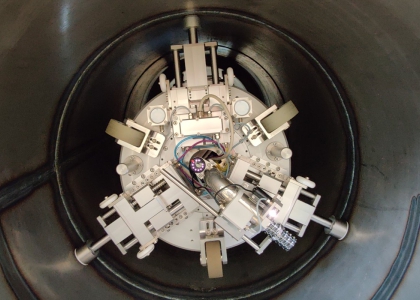
A combined grinding, suction and laser scanning robot consisting of a clamping and a drive unit, a remote-controlled, adjustable centring system, an axial stroke, a rotation unit, a grinding motor incl. radial stroke, a suction unit and a laser scanning system.
The suction unit is directly connected to the axial positioning system of the grinding motor, which uses a special mechanism to move the suction hose directly to the inner surface of the tube. With the help of the laser system it is possible to document the ground profile of the weld seam, which is displayed as a 2D graphic on a laptop. The scanning process and the laser head can be observed with the laser camera, a red laser dot marks the measuring point. In addition, the ablated layer thickness can be measured with by the laser sensor.
Connected by a flexible bellows, a drive unit moves the grinding, laser scanning and suction head forwards or backwards within the tube and also supports it in centring/stabilising it at the processing location.
Laser scans are performed at a total of eight different positions, before and after grinding. The scans are carried out at 0°, 45°, 90°, 135°, 180°, 225°, 270° and 315° and make it possible to define the best possible procedure for grinding before the actual processing by means of the initial profile mapping of the weld seam. During the subsequent scanning processes, it is checked whether the requirements of the given specification and standard are fulfilled. In this process, the angle of the ground weld seam, which results from the linear offset of the two sides of the pipe and the weld seam root, must be within a gradient of max. 7°.
All laser profiles are continuously recorded on a laptop using software. The weld root is displayed directly on the software screen, as is the angle of offset between the pipe and the weld root described above. The software calculates this value automatically and displays it directly in the laser profile scan. In addition, it is also possible to perform several measurements in one laser profile and have them displayed. The graphic with the measurements can be printed out directly or saved as a data record.


